
Making envelopes is a demanding and straightforward thing to learn. Best of all, you don’t have to get or fix the creases with a stick or some other gluing material. The creases collapsing themselves will close the wrap edges Any time you don’t have an envelope helpful, you can make one with this method.
You can utilize any sort of paper to make an envelope. In the event that you need an envelope for a birthday card, it may very well be a similar wrapping paper you use to wrap the present. Likewise consider utilizing any sort of shaded, designed, or scrapbooking paper. Indeed, even basic printer paper or an earthy colored paper sack will do.
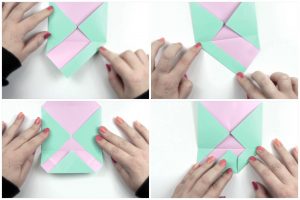
Start to Overlay to make an envelope
In the event that your paper has just one shaded or printed side, choose if you need it within or the outside of the envelope. In case you’re sending it via the post office, you might need to settle on the plain side to be outside, utilizing the designed side to add a fly of shading when the beneficiary opens up the envelope. To have the beautiful side looking out, start with the white (or plain) side up; start with the brilliant side up on the off chance that you need the outside to be plain.
Take the right corner over to one side corner and make a little squeeze in the middle.
Presently take the base corner up to the top and make another little squeeze in the middle. This gives you an X imprint.
Crease the left and right corners to meet the focal point of the X.
Keep on folding
Carry the top corner to the middle and make a light imprint in the center. You presently have a wrinkle mark. Overlay the base corner up to the wrinkle mark, keeping the left and right edges straight. Unfurl your paper.
Crease the Folds
Overlap the right edge of the base area inwards, lining up with the wrinkle you just made, and unfurl.
Crease the left side similarly and unfurl.
Overlap the base corner up to the wrinkle that is shown.
Re-crease the lower right segment. Observe the X that is on the lower focal fold under. The upper right place of the X lines up with the upper left corner of the fold on top.
Make the Mountain Folds
Open out the lower area, make another mountain overlap from the focal fold, overlay the right segment under the focal fold.
The photographs tell the best way to make the mountain overlap and the outcomes.
Do likewise on the left side.
Complete the Folds make an envelope
Re-crease the lower segment back up.
Addition the left and right folds inside the focal area that is currently within.
You could utilize a spot of paste on the folds to keep them secure.
Overlay the top down.
Also read: How to clear the cache on iphone.


online pharmacy india https://indiaph24.store/# п»їlegitimate online pharmacies india
india pharmacy mail order
https://indiaph24.store/# top 10 pharmacies in india
https://finasteride.store/# cost of generic propecia pills